Planning two weeks in Japan can feel overwhelming, I remember that feeling well from planning my own first trip. So I’ve put together the exact route I did, as a clear day-by-day plan with a free downloadable map, the best transport options, tickets vs JR Pass, cost estimates and simple where-to-stay advice with how many nights per stop.
This route is often called the golden route: Tokyo down through Hakone, Kyoto, Hiroshima and Osaka. We did it because we wanted a proper taste of Japan in our limited time, and it gave us several very different sides of the country in one trip without ever feeling rushed or exhausting. For me it’s the right shape for a first visit, and it works just as well if you’re coming back to see more.
I’ll be honest throughout rather than sell you the glossy version. I’ll tell you what was worth it, what I’d skip, and the odd thing other guides say to drop that I’d genuinely keep. The aim is to save you the mistakes I made, not to tick off every famous sight.
FREE GUIDE
Planning your trip to Japan?
I made a free 13-page guide that strips Japan planning down to the few decisions that matter.
No ads, instant download.
TL;DR My Two week Japan itinerary at a glance
Here is a simple summary of my recommended itinerary in Japan if you only have 14 days. Balancing enough time to enjoy your destinations but also seeing a chunk of what the country has to offer. Scroll down for a detailed day by day guide of what to do at each stop.
Who this suits: first-timers who want a mix of food, culture, and easy rail days.
- Day 1-4 Tokyo
- Day 5 Hakone
- Day 6-9 Kyoto
- Day 10 Half Day Trip Hiroshima
- Day 10 afternoon and night Miyajima
- Day 11-13 Osaka
- Day 14 Tokyo
Click here to jump to my detailed daily guides for each day of the itinerary
Downloadable interactive map of my Japan Itinerary
Get prepared for your Japan trip with my first-timer starter kit
- Break down the language barrier: key phrases and tech for an easy first trip
- How to stay connected: the cheapest data and easiest setup
- Avoid currency fees: the best cards for spending and cash
- 25 apps that make your trip easier: the best free downloads
- Save 30 to 90 minutes at the airport: the free Visit Japan Web QR code
- Etiquette do’s and don’ts: what to know on your first visit
Disclaimer: This article features affiliate links. If you click these links, and choose to book with that hotel or company, I will earn a small commission at no extra cost to you. I appreciate the support that allows me to continue providing this information
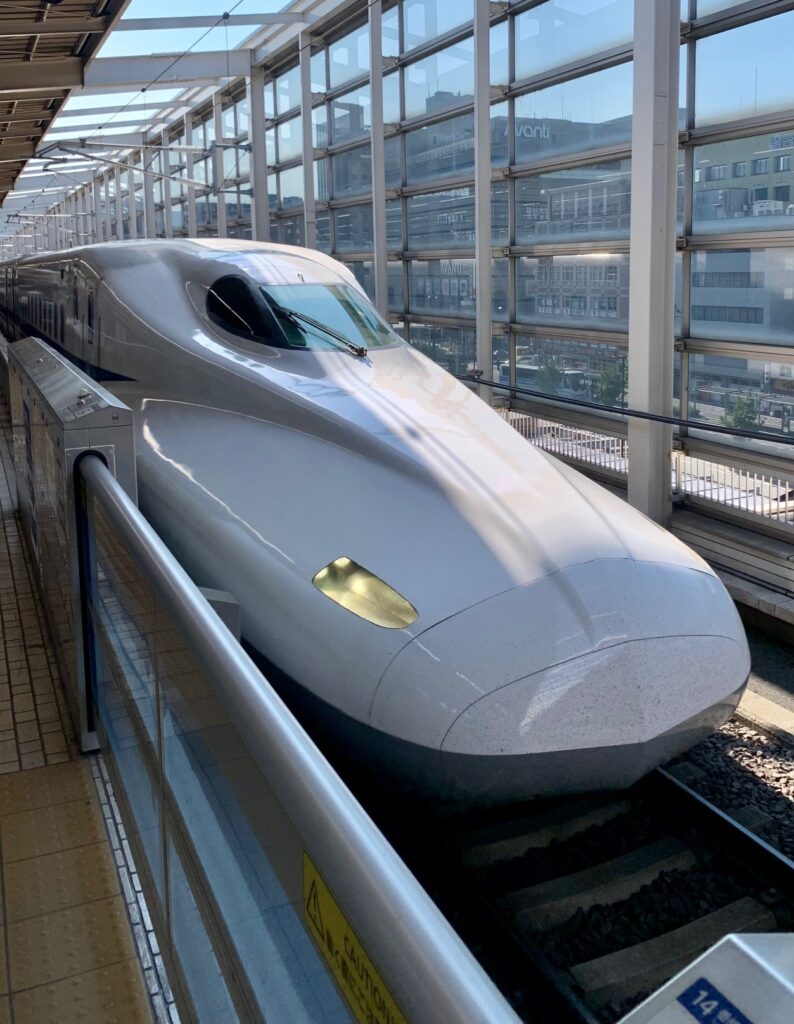
My recommended rail route, time and cost
For me, rail was the easiest way to get around Japan, and an experience in itself. There are cheaper ways, buses being the most cost effective, but for this route the trains are worth it.
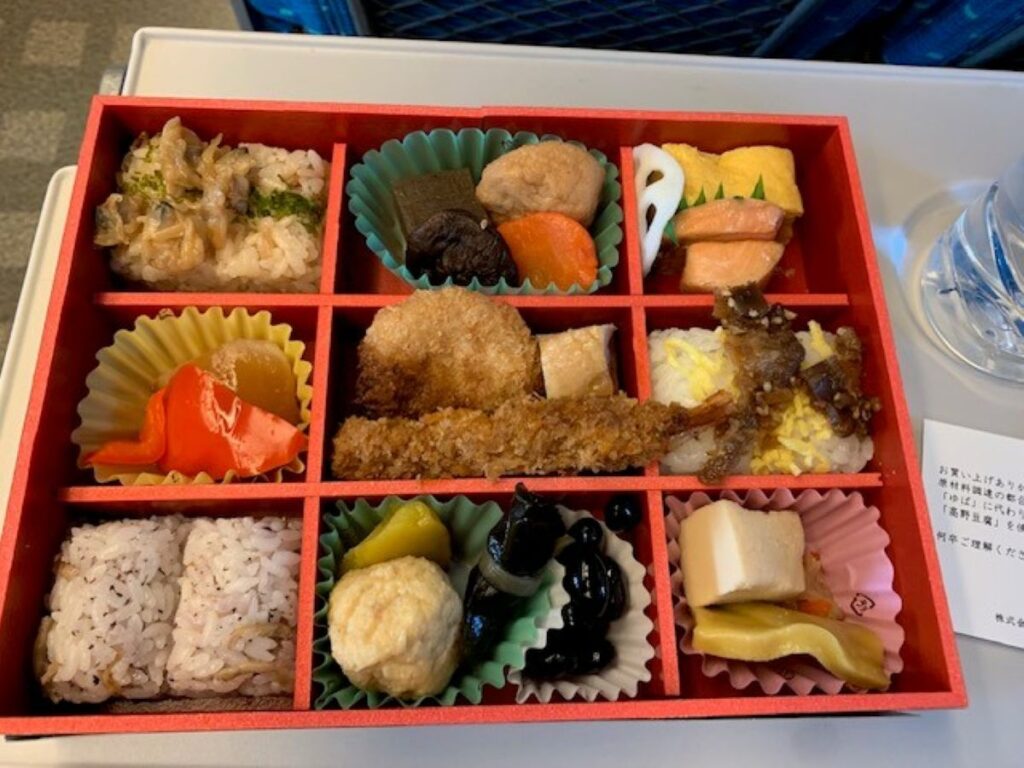
My Top Tip! We enjoyed the shinkansen and particularly the different ekiben you can find at each station, I highly recommend trying them.
| Leg | Mode | Typical time | Cost |
| Tokyo → Hakone (Odawara/Hakone-Yumoto) | JR or Odakyu + local | 1.5–2 hrs | ¥2,400–¥4,500 (£13–£25) |
| Odawara → Kyoto | Shinkansen | ~2 hrs | ¥13,500–¥15,500 (£75–£86) |
| Kyoto → Hiroshima | Shinkansen | 1:45–2:00 | ¥11,000–¥13,000 (£61–£72) |
| Hiroshima → Osaka | Shinkansen | ~1:30 | ¥9,500–¥11,500 (£53–£64) |
| Osaka → Tokyo | Shinkansen | 2:15–2:45 | ¥14,700–¥16,500 (£77–£92) |
Before You Go: Essentials for First-Timers
These are few of the tricks i’ve picked up along the way to save time and money, they are by no means mandatory, but I’ve found them useful
Visit Japan Web
What’s the secret to a smooth entry to Japan? 10 minutes of work in the comfort of your own home, using the Visit Japan website and creating a QR code. that helps you skip the queues and paper forms when you land
Here’s how I set it up in under 10 minutes and saved myself from long airport lines.
Money & payments
I had a lot of people tell me ‘Japan is cash only’ before my first trip. It was not our experience. We paid on card about 80% of the time with no trouble. The catch is that the cash-only places tended to be the ones we didn’t expect, small restaurants and the odd stall, so always carry some. It is the unexpected spots that catch you out.
We used two reliable international cards to save on fees – Wise and Revolut. We didn’t change any money before leaving, we withdrew using these cards in the county. 7-Eleven and Japan Post ATMs were the most reliable.
Another point I was unaware of before leaving. Tipping is not customary, especially in restaurants. The exception to the rule; we found some tour guides welcomed it.
Keeping your phone connected
I used an eSIM and set it up before flying, then activated it on landing. It was very simple to setup and significantly cheaper than my home networks roaming charges, it also enabled me to keep my number and receive texts and calls.
A pocket Wi-Fi also works if you’re in a group or have a phone that is locked
Things I recommend booking in advance in Japan
- teamLab Borderless: This digital art museum reopened at Azabudai Hills in 2024 and is hugely popular, so buy your tickets online ahead of time.
- Tokyo Disney Resort: Comprising Disneyland and DisneySea, the parks are incredibly popular and you’ll need to book ahead. My honest take though: I’d leave Disney off a first two-week trip unless you’re a die-hard fan, as a full park day eats a big chunk of your agenda. If you are going, there are plenty of hotels offering free shuttles
- Ghibli Museum: Dedicated to the works of Studio Ghibli, this museum requires advance reservations due to limited daily admissions.
- Sumo Tournaments: Tournaments are held seasonally, tickets sell out quickly and are notoriously hard to get hold of. Watching sumo practice is a fantastic alternative.
- Shibuya Sky: If you want a sunset time slot you will definitely need to book in advance, if you are more relaxed you should be ok.
- International Driving Permit: If you plan on hiring a car, or doing the Tokyo go karting, you will need this sorted in your home country before leaving
- Michelin star dinners: The thing I wish I’d known is that a lot of the big-name places need booking months ahead. We still got a couple by being flexible on times, but missed some we’d have loved. If you have a particular restaurant in mind, book it early. Otherwise stay flexible, there is plenty of choice.
Transport & Tickets: JR Pass or single tickets?
Quick verdict – For this route, point-to-point tickets were cheaper and simpler than a nationwide JR Pass.
This explains in detail why the JR pass likely isn’t the best deal for most travellers
An IC card makes your life easy
I loaded the virtual SUICA card onto my iphone, it’s free and make transport very simple across city trains, subways, and buses. Tap in and tap out.
For those without an iPhone, you can pick up a physical SUICA or PASMO IC card at the airports and most rail stations. You can top up at station machines. These cards don’t cover the shinkansen.
Seat reservations and train types
You dont need to reserve your seats on shinkansen, but I recommend it for peace of mind and especially if you are travelling in peak seasons.
Nozomi/Mizuho are the fastest shinkansen. Hikari/Sakura are slightly slower and ticket prices can reflect that.
Travelling Light: Luggage Forwarding & Lockers
It’s possible to forward your luggage between hotel stops, so you don’t have to navigate the journey with your bags.
I know a lot of people who found this a life saver, particularly those with families, big groups or lots of luggage.
For those looking to store your luggage for a day exploring, I did this in Hiroshima, coin lockers are readily available and most offer payment via IC card as well. There is an excellent free app that shares the location of all the options in each city.

Where to Stay on This Route (By City)
I have included my quick recommendations by city below for those in a rush. I have also written more detailed guides to each city, with excellent hand picked hotels for all budget – just click on the city name to be taken to my guide
Best area to stay in Tokyo
- Shinjuku: huge transport hub, food and nightlife; lively after dark.
- Shibuya: walkable and central for west-side sights.
- Asakusa: older streets, quieter evenings, near Sensō-ji and the river. Tends to be cheaper.
My personal favourite in Tokyo is Shibuya or Shinjuku. Both have fantastic transport links and have a lot to do day and night. Are you travelling as a family or big group, have a look at my guide to the best Tokyo hotels for families. They are apartment style accommodation or guarantee connecting rooms.
Best areas to stay in Kyoto
- Higashiyama/Gion: close to major temples and classic lanes. A lovely traditional feel.
- Kyoto Station area: simplest for day trips and those wanting ease.
- Downtown Kawaramachi: markets, dining, tram links.
My favourite in Kyoto is downtown, as you are close to a lot of the sights and their are lots of hotels to pick from.
If you are travelling as a family or big group, I have written a guide to the best family hotels in Kyoto too, with apartment-style rooms and options that sleep everyone.
Where to stay in Osaka
- Namba/Dōtonbori: food and night energy.
- Umeda: easy connections and calmer evenings.
- Tennoji: good value and direct rail.
In Osaka my favourite area is Namba, as you are right in amongst some of the best sights and street food. If you are a family or big group I have written a detailed guide on accommodation that will suit you.
Hiroshima/Miyajima: my choice
I stayed overnight on Miyajima. It gave me a quiet evening and dawn at the torii that I wouldn’t have had on a day trip. You can do it as a day trip, but I cannot stress enough how highly I recommend at least one night on Miyajima.
If you do, it’s a great opportunity to try a Ryokan on the island, beautiful traditional properties with fantastic food included.
I have also written a detailed 1 day guide to Hiroshima, if you want more information to make your decision.
Tokyo
Day 1: Shinjuku
I have written a detailed guide to Tokyo if you have a little more time, if not, read on for my highlights.
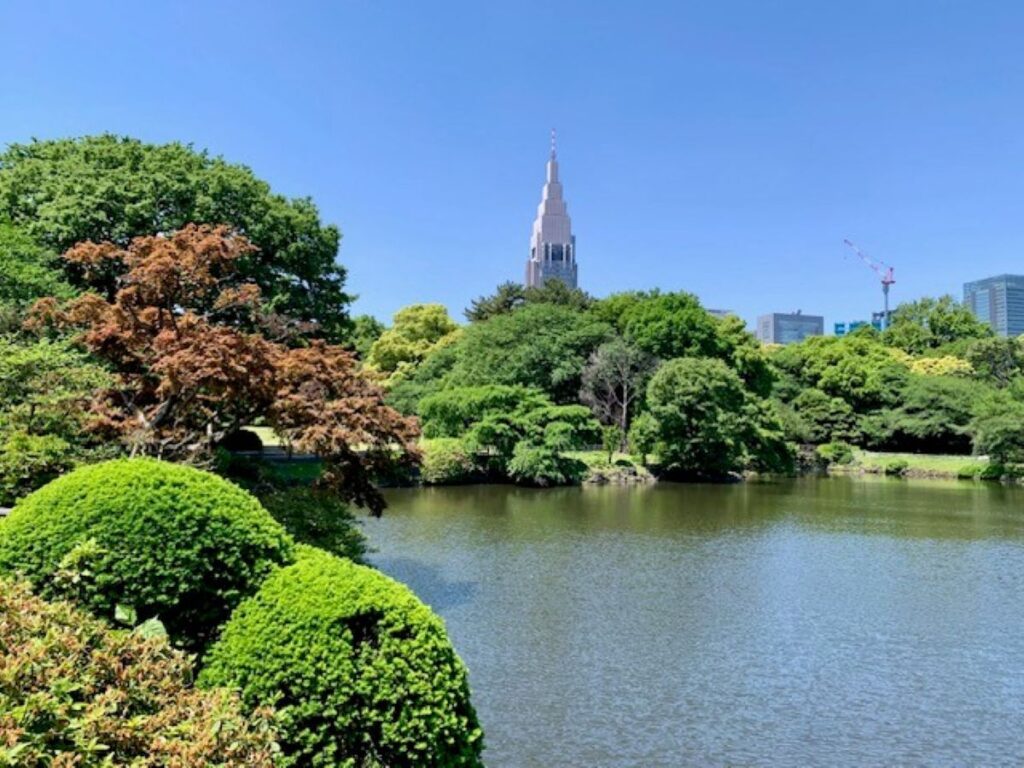
Begin your Japan Itinerary with a visit Shinjuku Gyoen National Garden, the best time to defeat the jet lag. Catch the unique Animated Cat Billboard, I bet you stay and watch this longer than you expect! The exact location is Cross Shinjuku vision, East Exit of the station.
My Top Tips: Shinjuku Gyoen is closed on Mondays and 23 Dec-3 Jan.
As night falls, explore the maze-like streets of Golden Gai, a myriad of tiny bars. It’s a sight to see and an opportunity for some good photos, but I’d also encourage going in and experiencing. This might feel intimidating at first, as it almost feels like you are walking into someone’s living room, but we tried several and everyone was very friendly. We were swapping music tips on the playlists and clinking glasses before we knew it!
When you have had your fill, head on to Omoide Yokocho (Piss Alley) for delicious yakitori cooked right in front of you. If you’re still going why not end your night with karaoke & in one of Shinjuku’s lively spots.
Or if you are ready to go out-out on your first night read my guide on the best clubs in Tokyo
Day 2: Shibuya and Harajuku
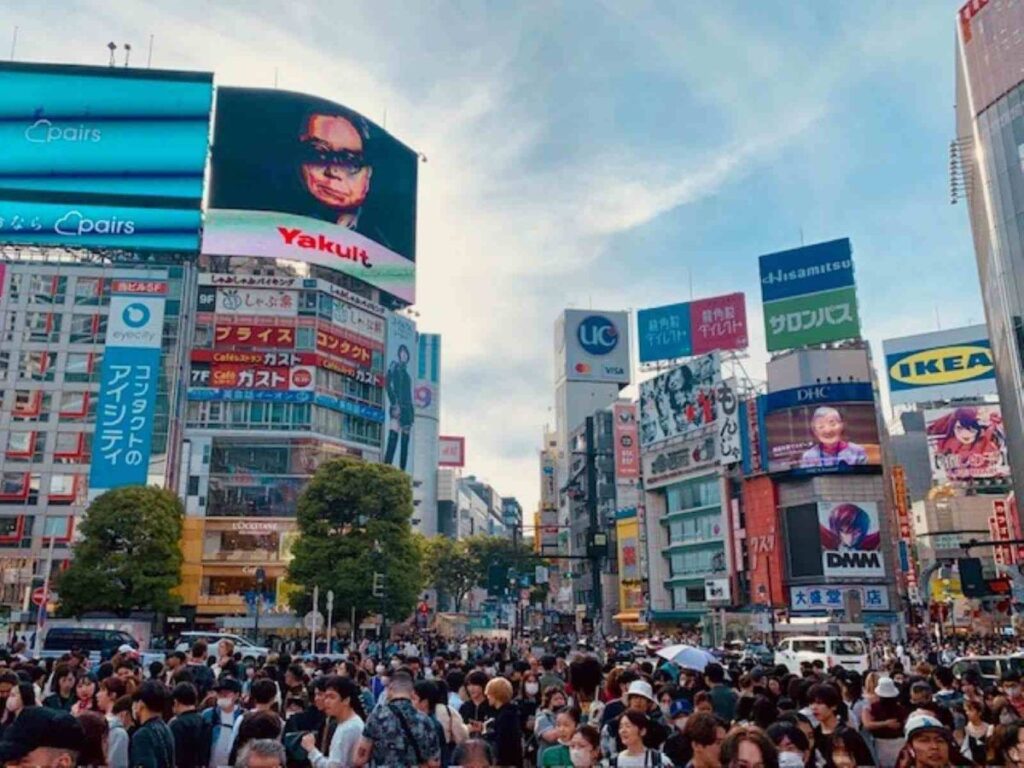
On the second of your full days, experience the famed Shibuya Crossing, the worlds busiest pedestrian crossing. I recommend doing the crossing, but also getting a view from above it, to really appreciate the scale. Also it’s good to get the obligatory time lapse video!
Following this, try an adrenaline rush of a Real-Life Mario Kart Tour around Tokyo. We loved it because it showed us more of the sights and was a lot of fun. Please note you will need to book in advance and will need your international driving permit. It’s worth the effort to get this on your itinerary in Japan.
We used Getyourguide to book our Mario Karting in Shibuya, BOOK YOURS HERE or if you prefer, you can book with Viator
Spend the rest of your day in Harajuku, where fashion-forward streets like Takeshita beckon with their unique style and quirky eateries.
Day 3: Asakusa and Sky-High Views

Visit Senso-ji Temple in Asakusa.Before you go into the temple, head up to the Asakusa Culture and Tourism Centre (open 9:00-20:00) for free views over it from above. This was a bit of a find when we went, and it costs nothing.
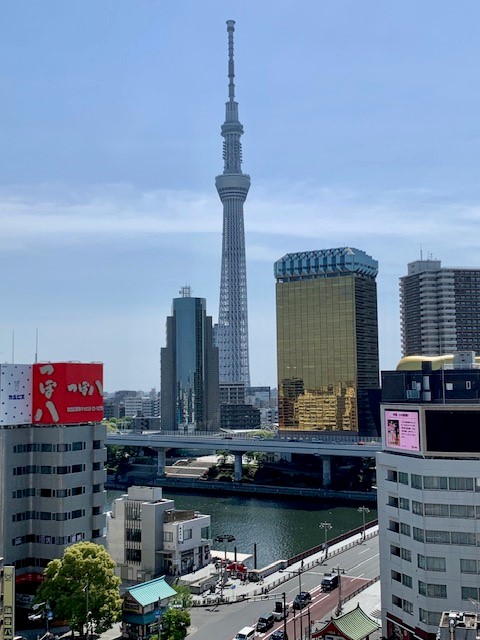
Following the temple, there is a nice walk to the Tokyo Skytree (you can save time and money booking your tickets online) if you feel like stretching your legs. The Skytree is Japan’s tallest tower and the views are pretty special. Walk along the Sumida river and over the pedestrian bridge before witnessing the city from above.
Day 4: Akihabara’s Arcade Haven and Ueno
Dive into the heart of pop culture in Akihabara, a dream for any fans of Manga and Anime. There are some great arcades in Akihabara too. We would recommend Super Potato for retro games and GiGO Akihabara for the latest and greatest across multiple floors (update: note that GiGO building 1 has closed, but the others are open). Seeing the locals and their passion for dance games is quite the sight, they take it very seriously!
Finally conclude your day relaxing in Ueno Park exploring its museums and zoo amid lush surroundings. There are several good options for food in the surrounding streets so why not make a full evening of it.
Optional extra day/Return to Tokyo at the end of the trip: Tsukiji Market
If you can stretch your time, I would recommend the following to truly complete your itinerary in Japan. Start the day at the Tsukiji Outer Market (open 08:00-14:00). The inner wholesale market moved to Toyosu back in 2018, but the outer market is still the place to go for fresh seafood and Japanese delicacies. Bring your appetite and your camera, the street food and small restaurants here are excellent.
When you are full to the brim, walk it off with a visit to Hama-Rikyu Gardens (¥300 entry) for a quiet break, then take a river cruise from Tsukiji to Asakusa, seeing Tokyo from the water.
Hakone
Day 5: Hakone: A retreat into Nature
Following the hustle and bustle of Tokyo you can now board your Shinkansen (bullet train to us laymen) to experience some true nature. I have written an in depth guide to Hakone here covering everything you need to know from activities to the best ryokan to stay in with private onsen. Read on below for the abridged version.
One recommendation I was given before travelling to Hakone was the Hakone Free Pass (¥6,100 for the 2-day pass from Shinjuku, or around ¥6,000 from Odawara as of 2026, prices can change so check before you buy). I’d tell any first-timer to get it.
It covers unlimited use of eight types of transport around Hakone, including the Hakone Tozan Train, cable car, ropeway and the Lake Ashi cruise ships, which is basically everything you’ll want to do.
It works out cheaper than buying each leg separately, and it gets you discounts at a fair few attractions and museums on top. We got more than our money’s worth out of it.
The order in which you tackle the activities is up to you, but I’d recommend them all. We were unlucky with the weather first time, and the cable car was closed so we visited the open air museum instead, something I’m pleased we did.
My Top Tip! Hakone gets busy on weekends and during peak cherry blossom and autumn weeks, but it stays quiet on weekdays and early mornings. Go midweek if you can and you’ll have the views largely to yourself.
Accommodation is much simpler in Hakone, as there are far fewer places to choose from. I recommend you stay centrally, walking distance to the ferry terminal and Heiwa no Torii. This is a good opportunity to stay in a traditional ryokan, for two reasons: there are several good options in Hakone, and they tend to include a delicious breakfast and dinner, which helps because food options in Hakone are limited.
If you are a big group, or worried about making your way around, there are a lot of good private tours available as well.
Kyoto: A step back in time
Kyoto is the heart of traditional Japan. Once the imperial capital, it has over a thousand temples and 17 UNESCO World Heritage sites, and the old streets and gardens feel a world away from Tokyo. For many people this ends up being a highlight of the whole trip.
I have written a detailed itinerary for Kyoto, if you are looking for an extra level of planning, including a free downloadable map.
Day 6: The Historical Higashiyama District
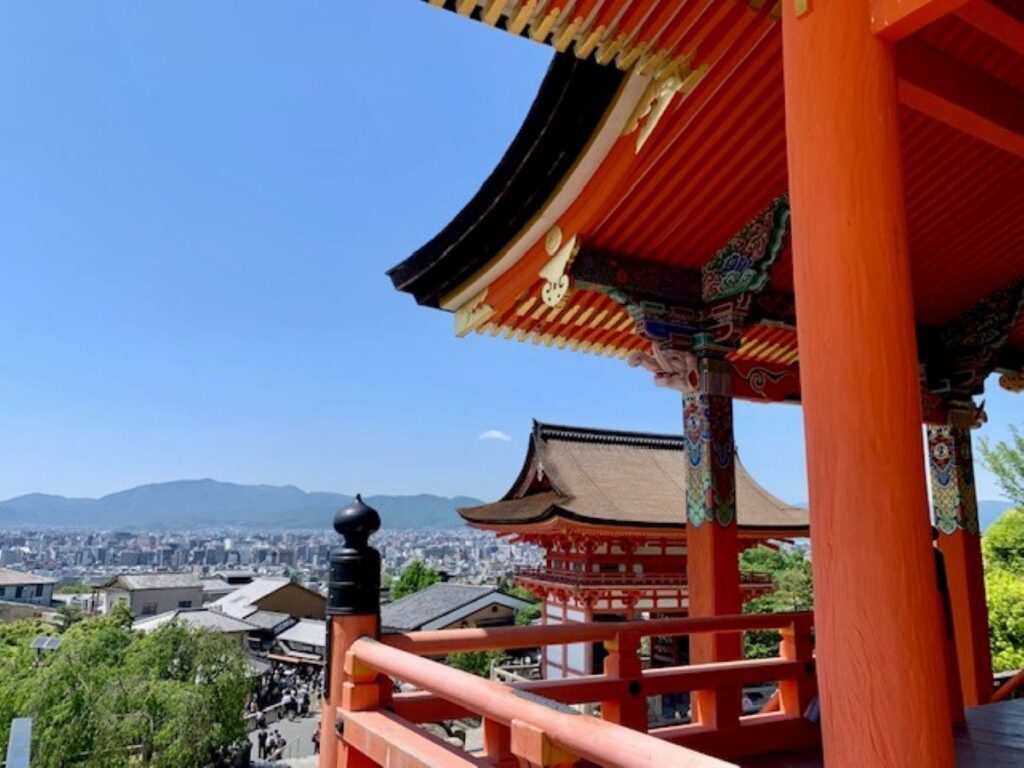
Begin with Kiyomizu-dera Temple, an iconic landmark with wide views over the city. Wander down the historic Sannenzaka and Ninenzaka slopes, lined with traditional shops and tea houses.
Explore Yasaka Shrine and the nearby Maruyama Park for a slower stroll. In the evening head to Gion. Walking into Gion felt different to anywhere else we’d been in Japan up to that point, the architecture is far more traditional and the lanes just off the main streets felt relaxed. Keep an eye out for a geiko or maiko, and be respectful with photos, this is where too many tourists have overstepped the mark.
For dinner, consider rounding off a special day with a special meal, Kyoto has many fantastic Michelin starred restaurants
Day 7: Kyoto Temples at sunset
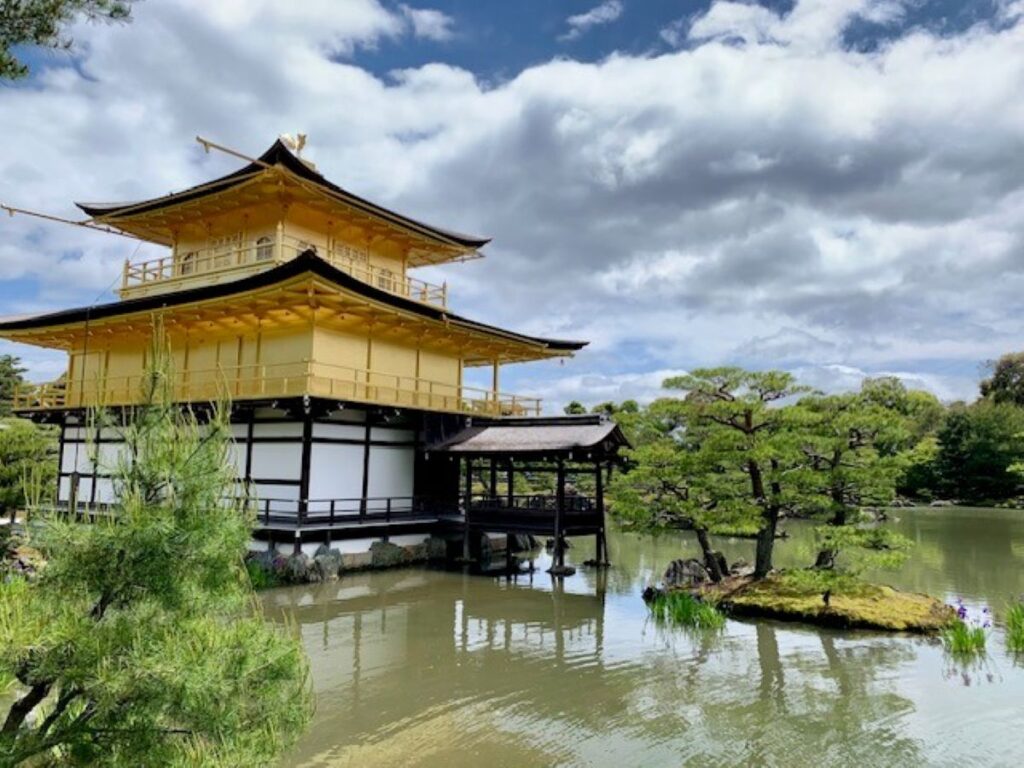
Visit Ryoan-ji Temple, known for its karesansui rock garden, then continue to Kinkaku-ji (the Golden Pavilion), covered in gold leaf with its reflection sitting in the pond in front. This was one of my favourite temples in the whole of Japan, it’s genuinely impressive in person and very easy to get a good photo of. Get there off-peak if you can, it gets busy in the middle of the day.
Following this you could take in Ninna-ji Temple, a quieter UNESCO World Heritage site with lovely gardens.. Or if you are operating at a more leisurely pace today save yourself as the next activity was a real highlight.
You will likely have seen countless photos of Fushimi Inari and the thousands of vermilion torii gates that wind up through the forest to the sacred mountain. The reality is as good as the photos. We walked up to the Yotsutsuji viewpoint, sat for a while and took in the wide view over Kyoto, and the gates got noticeably quieter the higher we climbed.
We did it for sunset into blue hour and I’d recommend the same, the light was the best part. The hike takes 2-3 hours round trip, so think about your footwear, and bring a torch if you’re coming down after dark.
Day 8: Arashiyama & Beyond
Start early in Arashiyama for the Bamboo Grove. I’ll be honest here: I wouldn’t cross town just for the bamboo. It’s nice, but on its own it isn’t a wow worth the trek, and it’s very crowded from about 07:30. Go first thing, or swap it for Adashino Nenbutsu-ji, the quieter alternative with its own bamboo lane and thousands of stone statues. We did both, and if I only had time for one I’d choose Adashino.
Following this, visit the Iwatayama Monkey Park for wide city views and some very cheeky monkeys, watch your belongings and don’t take food in!
Now at this point you will have clocked up a good amount of steps in Kyoto alone, let alone the rest of the trip so far. I recommend two activities to take the weight off, breathe and let yourself take it all in.
A boat ride down the Hozugawa River followed by a relax in one of Arashiyama’s traditional onsens to unwind. Point to note, the majority of onsens are split into male and female so if you are there with a travel companion of the opposite sex, this will be a bit of time apart. This may or may not be a welcome opportunity for some alone time, but I’ll let you decide. It’s your Japan Itinerary after all!
Day 9: The Imperial Palace and delicious food
Your final day in Kyoto is here, you may be experiencing severe temple fatigue at this stage. If you are, I recommend one more site of historical relevance (if you aren’t then good for you, add a few more on your last day)
Explore the Kyoto Imperial Palace and gain insight into the lives of Japan’s former emperors and take some time to wander through the Kyoto Gyoen National Garden surrounding it. I recommend paying a little extra, if budget allows for a guided tour of the imperial palace, as it was fascinating to learn about the building and the history.
With a very early start tomorrow, I recommend the rest of the day is all about food. Nishiki Market is Kyoto’s kitchen and I ate my way along here three times during our stay.
Walk the full length first to see what takes your fancy, then go back for it. The octopus on a stick with a quail’s egg in the head is the icon, but I’d also point you at the sashimi, prawn skewers and mochi.
Just behind Nishiki, A Happy Pancake does the best fluffy pancakes we had anywhere in Japan, go for opening as the queue builds fast.
It is a good idea to cap off your time in Kyoto with a visit to the Pontocho Alley, where modern bars and restaurants line the narrow alleyway, offering a wide range of food and drink options.
Hiroshima and Miyajima
Day 10: Some true history and an island escape
The Morning: Hiroshima
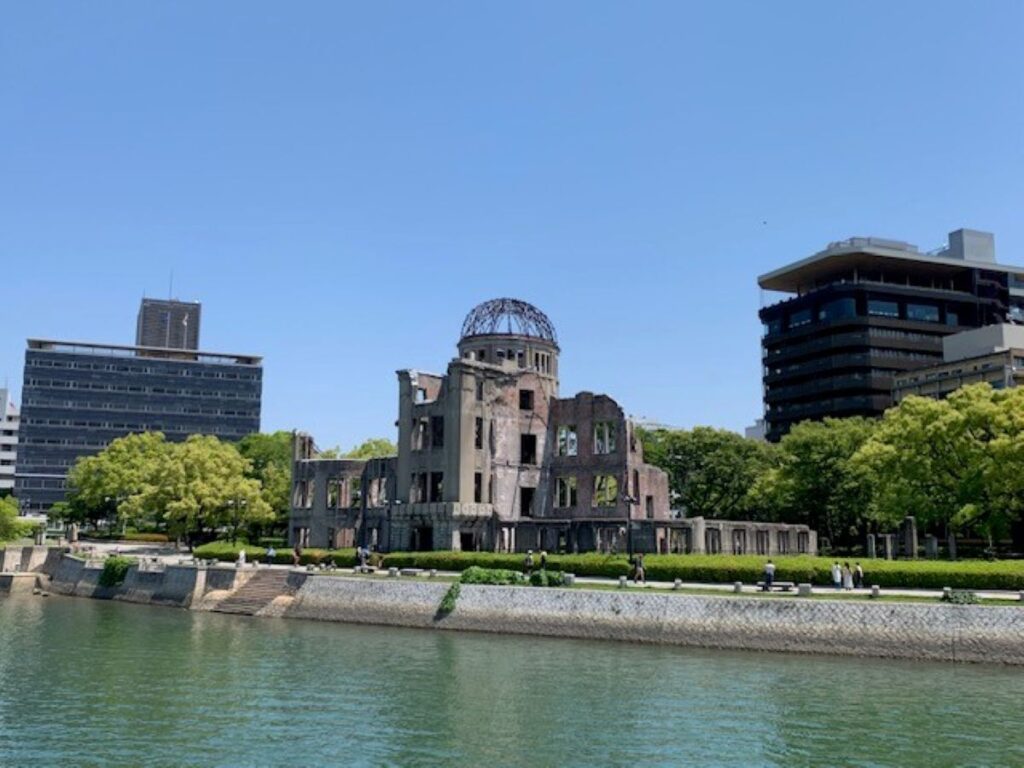
Hiroshima is somewhere a lot of travellers to Japan leave off their itinerary, however we wanted to come and take in the significant historical importance of the area and were really pleased that we did. There are two recommendations for your morning; the Peace Memorial Park and Museum and the Atomic Bomb Dome. These are located a 7 minute walk apart.
I highly recommend getting the audio tour for the museum as it highlights the scale of what happened and brought another fascinating layer of humanity and education to the whole situation and its aftermath.
If you have more time and want to spend a full day in Hiroshima, read my full guide
Afternoon and evening: Miyajima Island
Miyajima is a small island in Hiroshima bay, known for its scenery and culture. I have written a detailed guide covering what to do on Miyajima.
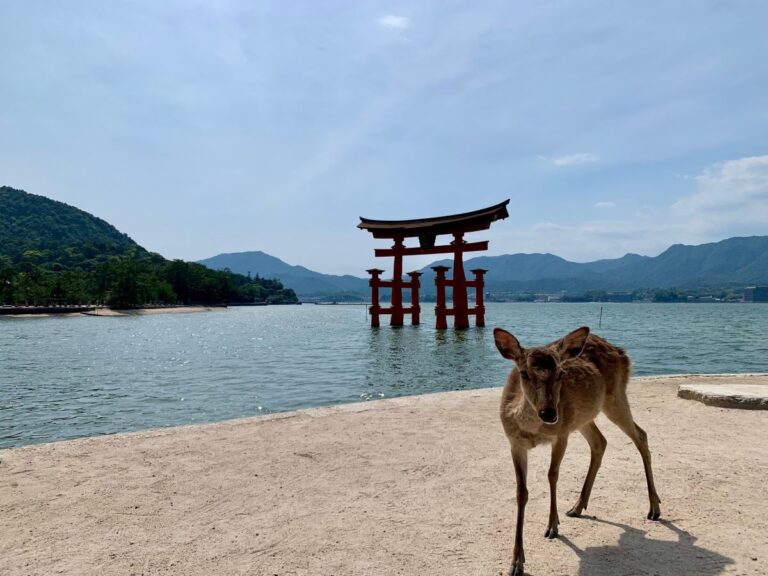
Whilst it is most famous for the iconic floating torii gate of Itsukushima Shrine, a UNESCO World Heritage Site , the highlight of the island for us was it’s natural beauty. I love the big cities but, for me this was one of the highlights of my Japan trip.
Activities
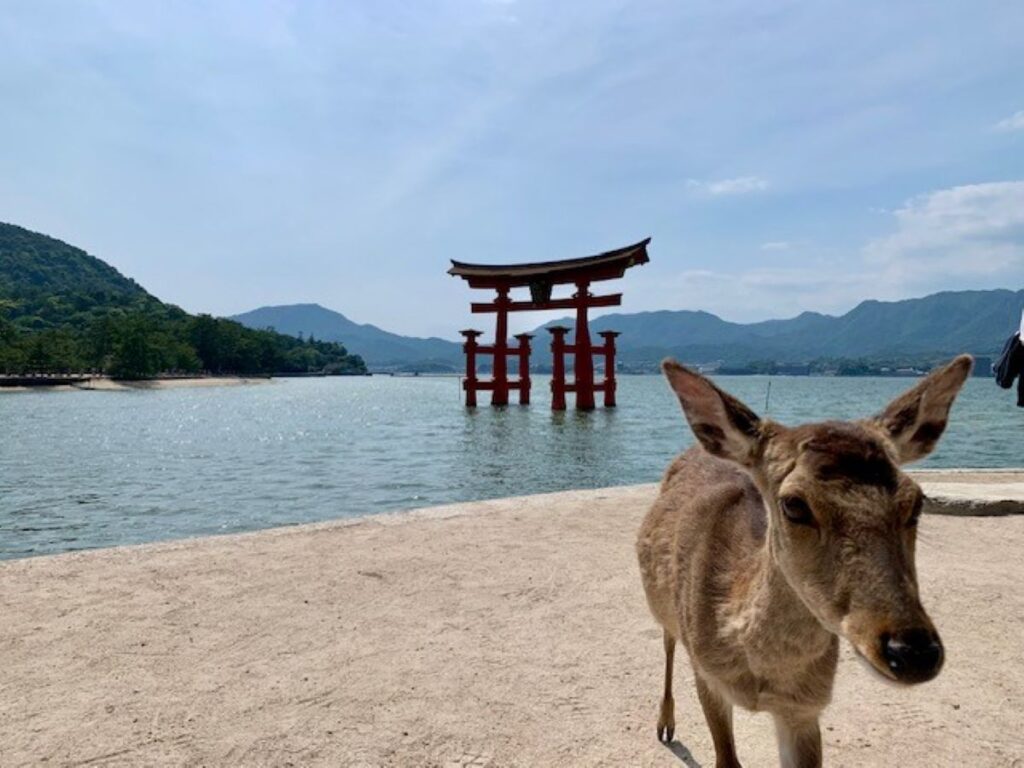
There are three things every traveller should tick off their list in Miyajima; spectacular Itsukushima Jinja, exploring Mt Misen and the local wild deer. I suggest checking into your hotel, changing ready for a hike and then heading straight to the floating torii, camera in hand. Check the tides, as the gate is only “floating” at high tide, but given you are staying the night you will have a couple of opportunities to witness this.
After visiting the torii gate head to the cable car station for Mt Misen. You have the option to hike or take the cable car, one of both ways. With time of the essence we opted to get the cable car up and then hike back down. The view from the top is stunning. On the walk back down, take the route past Daisho-In, a quieter Buddhist temple that plenty of people miss, and well worth the entrance fee.
Depending on the time of year you will be back at the gate just in time to witness sunset and get some more fantastic shots of the torii gate, which may, or may not, now be floating.
No mention of the deer you say, well they will be present at all parts of this brief itinerary and we found them to be more friendly and a lot less pushy than those in Nara! Don’t feed the deer here though, as it’s forbidden on the island.
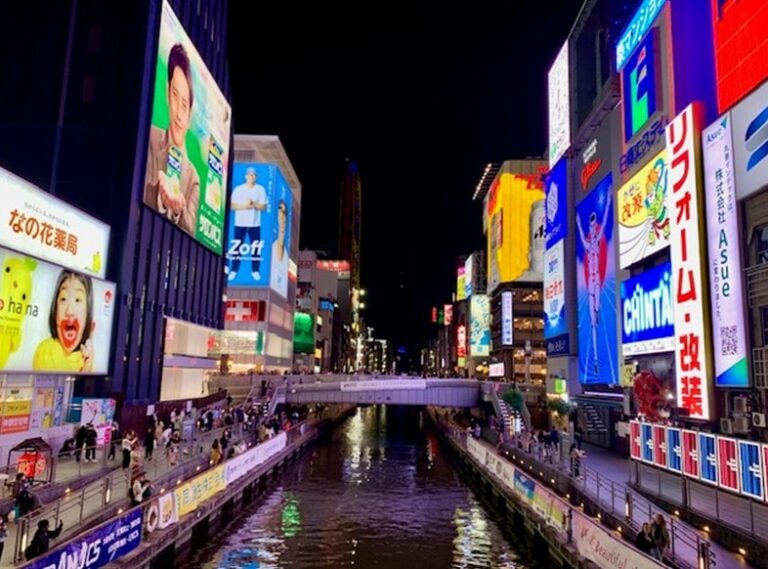
Osaka: Japan’s Kitchen
Osaka is Japan’s city of food, neon and late nights. Locals have a motto, ‘kuidaore’, which means ‘eat until you drop’, and that tells you most of what you need to know. It’s a challenge we accepted with glee. The food was exceptional everywhere on this trip, but Osaka was the best of the lot.
Try my in depth guide to Osaka and how to get from Kyoto to Osaka.
Day11: Shopping and the Osaka Bay area
You will likely arrive quite late in the day having travelled from Miyajima so I recommend a light schedule for the day. Begin your Osaka adventure with a visit to Shinsaibashi, the city’s premier shopping district. The area’s covered shopping arcade stretches for several blocks, offering everything from high fashion to traditional goods. Whilst there hasn’t been much shopping on my recommended Japan Itinerary yet, this is a natural opportunity.
Conclude the day at the Tempozan Harbour Village, home to the Osaka Aquarium Kaiyukan, one of the largest public aquariums in the world. One honest steer: if aquariums aren’t your thing, skip it, you won’t be missing the heart of Osaka. Nearby, the Tempozan Ferris Wheel lights up the night and gives you a good view over the bay.
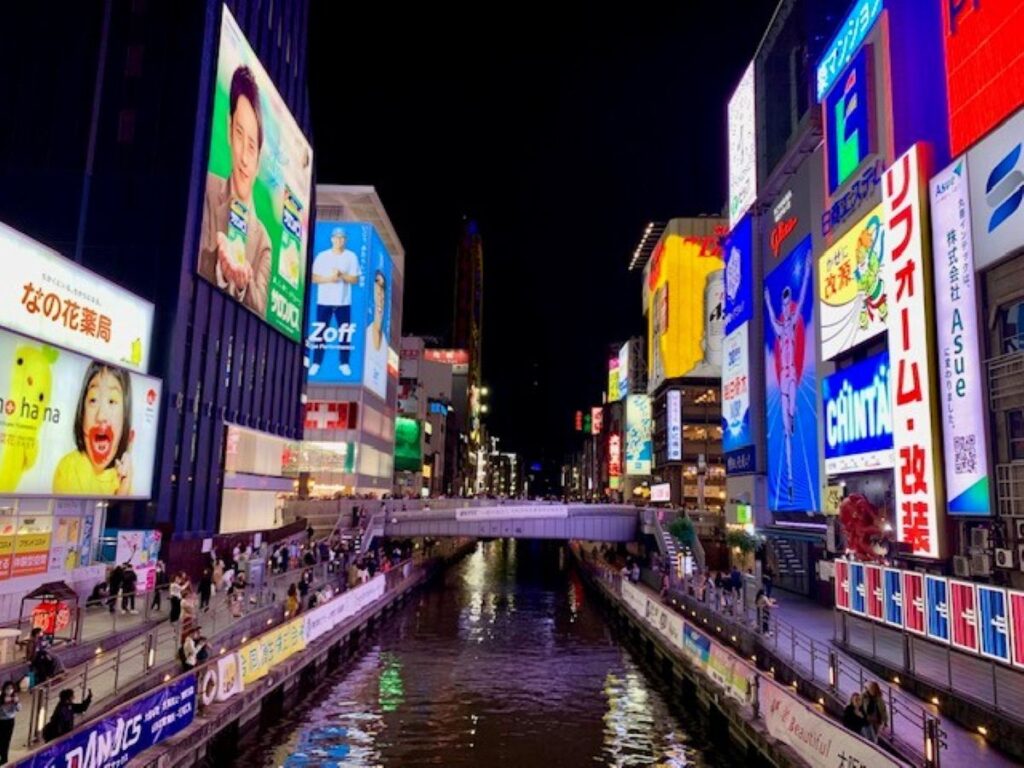
Day 12: Dotonbori’s Delights
Start with breakfast at Kuromon Ichiba Market, where the stalls do fresh sushi, sashimi and plenty more. It’s a good way to ease into the city.
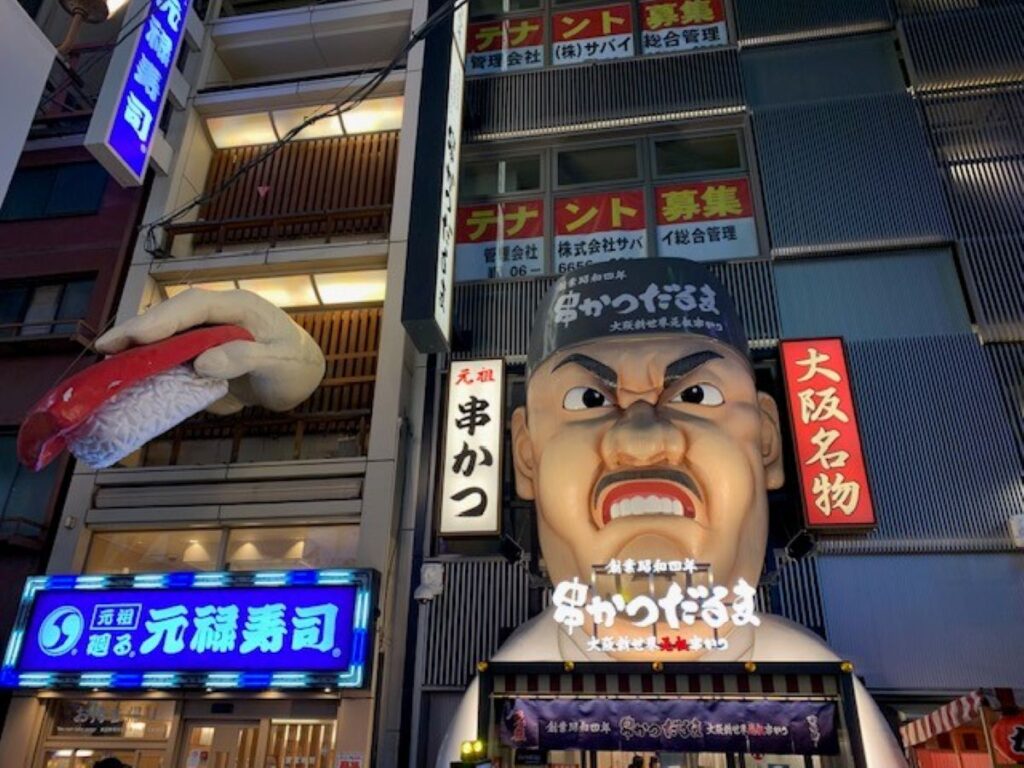
Then make your way to Dotonbori, the centre of Osaka’s food and neon. Sample the street food, takoyaki (octopus balls) and okonomiyaki (savoury pancakes), and get your photo with the Glico Man sign. For a drink afterwards, track down Fanny Mae’s, a tiny, dimly lit bar with the walls and ceiling buried under vinyl and old rock posters. It’s exactly the kind of place you hope to stumble on in Osaka.
To cap off the day, explore Amerikamura, known as ‘Amemura’ to locals, a district built around fashion, nightlife and American-inspired culture. While you’re there, Space Station is a video game bar with a good cocktail and beer list and all the games you can play for free, the staff kept our group entertained for hours.
Osaka was the friendliest place we found for a night out in Japan, lots of welcoming locals, conversation in broken English over Google Translate, and the odd shared karaoke mic.
If you’ve got the energy, a day trip to Nara is worth weighing up. I did it on my trip and was glad I did, it’s great and easy to reach. That said, if you’re worried about timing and tiredness, and you’re already doing Miyajima for the deer, you could happily leave it. It comes down to how busy you like your trips.
Day 13: Osaka castle
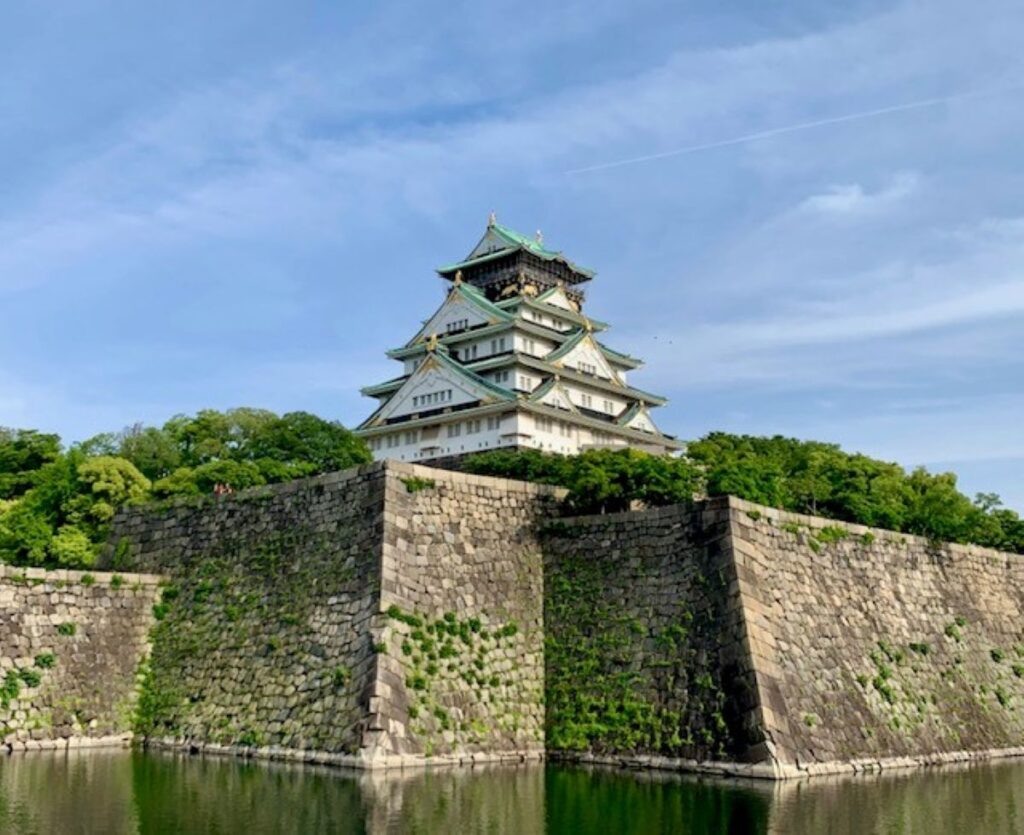
Your final full day in Japan starts at Osaka Castle, and for me this one is an absolute must. The grounds are a big park with hundreds of cherry trees, so it’s a popular spot in blossom season. Make the trip to the very top for the views (adult entry is ¥1,200, about £6, up from ¥600 in 2025). I’ve written a detailed cherry blossom planning guide to help you make the most of it.
Just across from the castle is the Osaka Museum of History, if you want to read more into the city’s past.
Your final activity in Osaka is the Floating Garden Observatory at the top of the Umeda Sky Building, which gives you a wide view over the city and one last good photo.
My Top Tip! If Osaka throws a rainy day at you, head to Round One Stadium and its Spocha floor. It was our biggest surprise of the trip. Once you’re in, the bowling, batting cages, arcade games and more are all included for your time slot. We planned three hours and stayed far longer. Great value and a proper laugh.
Day 14: Head back to Tokyo to leave
Make an early start back to a Tokyo station for your flight, or stay an extra day like we did and squeeze the last bits out of a country we weren’t ready to leave.
How much should I budget for Japan?
Budget is always subjective to the person, below I’ve tried to represent a sensible range that should cover an average amount per person per day so you have a steer to plan with.
| City | Stay | Food | Transport | Sights | Daily total |
| Tokyo | ¥12,500–¥25,000 (£70–£140) | ¥4,500–¥8,000 (£25–£45) | ¥1,000–¥2,200 (£6–£12) | ¥1,800–¥4,500 (£10–£25) | ¥19,800–¥39,700 (£111–£222) |
| Kyoto | ¥11,500–¥21,500 (£65–£120) | ¥4,000–¥7,200 (£22–£40) | ¥900–¥1,800 (£5–£10) | ¥1,800–¥3,600 (£10–£20) | ¥18,200–¥34,100 (£102–£190) |
| Osaka | ¥10,500–¥19,500 (£60–£110) | ¥4,000–¥7,200 (£22–£40) | ¥900–¥1,800 (£5–£10) | ¥1,400–¥3,200 (£8–£18) | ¥16,800–¥31,700 (£95–£178) |
| Hakone | ¥14,000–¥26,000 (£80–£150) | ¥4,500–¥8,000 (£25–£45) | ¥1,800–¥3,600 (£10–£20) | ¥1,800–¥3,600 (£10–£20) | ¥22,100–¥41,200 (£125–£235) |
| Hiroshima/Miyajima | ¥9,500–¥17,500 (£55–£100) | ¥3,600–¥6,300 (£20–£35) | ¥900–¥1,800 (£5–£10) | ¥1,400–¥3,200 (£8–£18) | ¥15,400–¥28,800 (£88–£163) |
Getting to Japan
Traveling to Tokyo from international destinations is a journey well-served by two major airports. Narita International Airport (NRT) and Haneda Airport (HND).
Not sure which airport to fly into for this two-week route? See my Haneda vs Narita guide for the full comparison on cost, transfer time and onward travel.
Narita, located about 60 kilometres east of central Tokyo, is a global gateway, connecting travellers from all over the world to Tokyo. It primarily handles international flights. It primarily handles international flights and offers a range of transportation options to the city. These include the Narita Express (N’EX) train, limousine buses, and taxis. Take a look at my full guide to eSIMs, WiFi hotspots and sim cards in Narita airport as well as the best airport transfer options from Narita to central Tokyo.
Haneda, situated closer to the city centre, has traditionally been the domestic hub but has expanded its international terminal. This makes it an increasingly popular choice for direct flights from various countries. Offering both convenience and efficiency, Haneda allows for quicker access to Tokyo’s heart through a variety of public transport, including the Tokyo Monorail and Keikyu Line.
Arriving late into Narita or Haneda and need to stay close to the airport? Here are hotel options with free shuttle buses for Haneda and complimentary shuttles near Narita
If your flights land at Narita but you need to fly out of Haneda (or vice versa), my Narita to Haneda transfer guide walks through every option and the connection time you’ll actually need.
My Top Tip! Look into an open-jaw flight, flying into Tokyo and home out of Osaka (or the reverse). This route ends in Osaka, so flying home from there saves you a day backtracking to Tokyo just to catch a flight. It sometimes costs a little more than a standard return, so compare prices, but the day you get back is often worth it.
Is Two Weeks Enough to Explore Japan?
One of the biggest questions for a first trip is whether two weeks is actually enough. Japan packs in a lot: the neon of Tokyo, the old temples of Kyoto, the food in Osaka, the bullet train between them. Two weeks won’t cover all of it, but it covers the best of this route comfortably.
In my opinion, for first-time visitors, two weeks in Japan offers just the right amount of time to explore the major highlights without feeling too rushed. It’s enough to get a feel for both the cities and the quieter spots, get into the culture, and find a few places you weren’t expecting to love. Just keep your expectations realistic. Japan is vast, and every region has its own character.
If you are unfortunate and find yourself tight on time, my perfect 7 day tour guide to Japan here could be just what you need!
FREE GUIDE
Planning your trip to Japan?
I made a free 13-page guide that strips Japan planning down to the few decisions that matter.
No ads, instant download.
FAQs for two weeks in Japan
Two weeks is enough to comfortably do the golden route, Tokyo, Hakone, Kyoto, Hiroshima, Miyajima and Osaka, without rushing. You won’t see everything, Japan is huge, but you’ll get a proper feel for the cities, the culture and the food. For us it was the right balance, and it left us wanting to come back.
The golden route is Japan’s most popular first-trip itinerary, running from Tokyo down through Hakone, Kyoto, Hiroshima and Miyajima to Osaka. It links the country’s headline cities on one fast rail line, so you get modern Tokyo, traditional Kyoto and Osaka’s food without backtracking. It’s the route I did and recommend.
As a mid-range guide, budget around £2,500 to £3,500 per person for two weeks, excluding flights. That covers comfortable hotels, eating out daily, all your trains including the bullet train, and attractions. You can do it for less with budget stays and konbini meals, or far more with ryokan and Michelin dinners.
For this golden route, usually not. The 2023 price rise means point-to-point bullet train tickets normally work out cheaper than a 14-day pass, since you’re not constantly criss-crossing the country. I break down the maths in my full JR Pass guide, but for most first-timers on this route, individual tickets win.
Spring (late March to April) for cherry blossom and autumn (late October to November) for the leaves are the two best windows, with comfortable weather and good colour. Both are popular, so book early. Summer is hot and humid, winter is cold but clear. My best time to visit guide covers the trade-offs.
Trains, easily. The shinkansen (bullet train) links the cities on this route, and inside each city a tap-and-go IC card like Suica covers the metro and buses. Buy point-to-point bullet train tickets rather than a rail pass for this route. Google Maps and Google Translate handle the rest with no trouble.
No. UK, US, Canadian, Australian and most EU passport holders enter visa-free for short tourist stays, you just need a valid passport. UK visitors can stay up to six months; most others get 90 days. JESTA, Japan’s planned online pre-authorisation, is not required until around 2029, so ignore any site charging for it now.


32 Comments
Comments are closed.