On my first trip to Japan I paid for my home network’s roaming bundle and spent half the trip frantically hunting for WiFi anywhere I could find it. It was expensive and stressful. Exactly the opposite of what I wanted on a holiday I’d spent months planning.
I’ve since used Airalo eSIM on trips across 5 continents, and I wouldn’t go back. If you’re reading this, you’re probably weighing up whether to grab a SIM card in Narita Airport when you land, sort an eSIM before you leave, or rent a pocket WiFi. This guide is my honest take on all three, with current prices and the counter locations at Narita if you do want to go physical.
The bit I wish someone had told me before that first trip: eSIM would have saved me a small fortune in roaming charges in Japan, and in a lot of other countries since. If your phone supports it, this is genuinely the easiest decision in travel tech.
More of my Japan guides to plan around your trip
- Where to stay in Tokyo — Best bases and hotels for first timers visiting Tokyo
- How many days in Osaka — A ready made itinerary for the best things to see in Osaka
- Tokyo 3 day itinerary — A guide to the best sights and hidden gems.
- Kyoto in 2 Days — A guide to everything you will want to do in Kyoto
- Perfect Hakone Loop — What to do and how to get around when you are in Hakone
- Japan Two-Week Itinerary — How to plan a wider route without backtracking.
- Kamakura day trip from Tokyo — One of the most rewarding trips from Tokyo
What mobile data options do I have?
Landing at Narita (and Haneda) you’ve got three real options for data: an eSIM, a physical SIM card, or pocket WiFi. Below is the honest version of what each is like to use, then there’s a comparison table further down if you want the quick view. SKIP TO THE COMPARISON TABLE
1. eSIM
An eSIM is a digital SIM you download to your phone, usually as a QR code, before you leave home. No physical card to insert, no kiosk to find, no original SIM to lose. You activate it when you land and you’re online. For me, this is the easiest option by a long way.
Pros:
- You’re set up before you fly. You buy and install it at home, then activate when you land. No counter to find after a long flight, no queue, no faff.
- Your home number stays live. The eSIM sits alongside your physical SIM (dual-SIM), so you keep your normal number for calls and texts from family or your bank.
- Nothing physical to lose. No taking out your home SIM and storing it in a hotel safe for two weeks.
- Cheapest option in my experience. Airalo’s 10GB plan is about £13 ($18), well under what physical SIM counters or pocket WiFi cost for the same data.
Cons:
- Your phone needs to support eSIM. Virtually every phone sold in the last 5 years does (iPhone XS / 2018 onwards, most Samsung Galaxy and Pixel models from 2020 onwards). Worth checking your phone’s settings before you buy.
- Data only, no Japanese number. Most travel eSIMs don’t give you a local phone number. For first-time visitors this almost never matters, WhatsApp, iMessage and FaceTime cover what you actually need.
- You need a working internet connection to install it. Do this at home before you fly, not at the airport on hotel WiFi after landing.
My Top Tip! Buy and install the eSIM at home a day or two before you fly, but don’t activate it until you land. Most plans only start counting the validity period from activation, not purchase, so you don’t burn a day on transit time.
2. Physical SIM Cards
A physical SIM is the traditional tiny plastic card you swap into your phone in place of your home SIM. You can buy one at counters in the Narita arrivals area, in convenience stores, and at electronics shops like BIC Camera. I’ve not used one myself because eSIM has been faultless for me, but they’re a sensible option if your phone doesn’t support eSIM.
Pros:
- Works with any unlocked phone. No compatibility checks needed. If your phone takes a SIM, this will work.
- Some plans include voice calls and a Japanese number. Rare to actually need this as a tourist, but worth knowing if you do.
- Available at the airport on arrival. Counters in T1 and T2, plus 24/7 vending machines if you land outside counter hours. Locations and hours are further down.
Cons:
- You have to do the setup after a long flight. Find the counter, queue, swap the SIM, activate it. Not what you want after 11 hours in economy.
- You need to safely store your home SIM for the trip. It’s a tiny piece of plastic that’s easy to lose.
- Topping up is a faff. If your data runs out, extending or reloading the plan often means another trip to a shop or a clunky website.
- Usually more expensive than eSIM for the same data. Around £15 to £25 for 10GB over 15 days at counter prices, versus Airalo’s £13.
If your phone supports eSIM, I’d still go eSIM. The convenience gap is bigger than the price gap, and the price gap already favours eSIM.
3. Pocket WiFi
Pocket WiFi is a small portable router you rent for the duration of your trip. It connects to a Japanese mobile network and creates a private WiFi hotspot that all your devices can join. You pick it up at the airport or have it sent to your hotel, and you return it by post when you leave.
Pros:
- Best value for groups of three or more. One device, one rental, everyone connects. The per-person cost drops fast once you’re past two people.
- Connects laptops, tablets and phones at the same time. Useful if you’re working on the road or travelling with kids and devices.
- Unlimited data on most plans. Less stress about going over a data cap if you’re a heavy user or streaming a lot.
- Prices have dropped a lot recently. NINJA WiFi starts at about ¥440 per day (around £2 per day) on basic plans booked in advance. Japan Wireless unlimited works out about ¥695 per day (around £3.20 per day) on a 30-day rental. Walk-up rates at the airport are higher, so book online before you fly.
Cons:
- Another gadget to charge. Most pocket WiFi devices last 4 to 8 hours of active use. If it dies mid-afternoon, everyone in your group loses data at once.
- You all have to stay together for it to work. Split up to do different things and one of you is offline.
- Pickup and return adds steps to your trip. Counter pickup on arrival, return by post or counter on departure. Easy enough, but more than the zero steps eSIM needs.
- Overkill for solo or couple travellers. If it’s just one or two of you, eSIM is cheaper and simpler.
Comparison Table
| Feature | eSIM | Physical SIM | Pocket WiFi |
|---|---|---|---|
| Setup | Buy and install at home, activate on arrival | Visit a counter or convenience store on arrival | Reserve online, collect at airport counter |
| Device compatibility | eSIM-capable phone (most from 2018 onwards) | Any unlocked phone | Any device with WiFi |
| Best for | Solo and couple travellers | Older phones without eSIM | Groups of 3 or more |
| Voice calls | Data-only (WhatsApp / FaceTime fine) | Some plans include voice | No voice |
| Extra device to carry | No | No | Yes, plus charger |
| Typical price (10GB, ~2 weeks) | Airalo about £13 ($18) | Around £15 to £25 at counters | Around £30 to £45 (3 to 4 days unlimited) or longer at lower daily rates |
| Available 24/7 on arrival | Yes (once activated) | Vending machines yes, counters no | Counter hours only |
Disclaimer: This article features affiliate links. If you click these links, and choose to book with that hotel or company, I will earn a small commission at no extra cost to you. I appreciate the support that allows me to continue providing this information
Get prepared for your Japan trip with my first-timer starter kit
- Break down the language barrier: key phrases and tech for an easy first trip
- How to stay connected: the cheapest data and easiest setup
- Avoid currency fees: the best cards for spending and cash
- 25 apps that make your trip easier: the best free downloads
- Save 30 to 90 minutes at the airport: the free Visit Japan Web QR code
- Etiquette do’s and don’ts: what to know on your first visit
My top recommendation and what I used
I use Airalo and I’ve recommended it to anyone who’ll listen, including my parents who are not tech-savvy and now use it on their own. I’ve written a detailed Airalo review as a result.
Specifically, I’ve used the Moshi Moshi 10GB / 30 days plan, which is about £13 ($18) right now. Across two weeks in Japan I ran Google Maps constantly, Google Translate for menus and signage, Instagram, FaceTime home, and tethered my laptop and iPad off the eSIM for evening admin. 10GB has been more than enough each time. Some heavier users might want 20GB to be safe, but for most first-timers 10GB is plenty.
The setup took about 10 minutes the first time, and it activated within 30 seconds of landing. I was sceptical going in, but the Airalo app walks you through it step by step. I followed the instructions exactly and it just worked.
Why I made this decision:
- I could set it up and pay from home before flying. Knowing I’d be online the moment I landed was worth a lot after a long flight.
- I’ve had no dropouts or connection problems across multiple trips.
- I didn’t want to carry a separate pocket WiFi device, or worry about charging another gadget.
- I didn’t want to take my UK SIM out and risk losing it.
- It was the cheapest option for me. Honestly, this was the last thing I considered. Convenience was the main reason.
Discount codes:
10% discount code: AIRALOESIM10
15% discount for first time users: NEWTOAIRALO15
Have you decided the best way to get to your hotel? Have a look at the best airport transfer options from Narita
Pick the right option for you
A quick guide to who each option suits, based on what I’d actually tell a friend:
- Pick eSIM if you’re a solo traveller or couple. I’ve set this up for my parents who are not tech-savvy at all, and with a bit of help on day one, they loved it. For most readers this is the right call.
- Pick a physical SIM if your phone doesn’t support eSIM, or if you specifically want a Japanese phone number with voice calling.
- Pick pocket WiFi if you’re a family or group of three or more sharing one device, or if you want one piece of gear handling all your devices and don’t mind charging it daily.
I want a physical SIM card in Narita Airport
If you’ve decided a physical SIM is right for you, there are several reliable counters in the Narita arrivals area. The three I’d point you to are SoftBank Global Rental, JAL ABC, and BIC Camera. I haven’t personally used any of these because eSIM has been faultless for me, but the locations are obvious and easy to find in the arrivals halls. Walk straight out of customs and follow the signs.
Softbank Global Rental

SoftBank Global Rental has counters in both Terminal 1 and Terminal 2 at Narita. Both also sell SIM products under the AnyFone Japan brand.
Terminal 1: Central Building, 1st floor, before security check. Right next to the central entrance of the arrival floor.
Opening hours: 07:00 to 21:00
Terminal 2: Main Building, 1st floor. Right in the middle of the international arrivals area.
Opening hours: 07:00 to 21:00

JAL ABC Airport Counters
They have locations in Narita terminals 1 and 2 and offer options of a local sim card from multiple network carriers.
JAL ABC Arrival Counter Terminal 1
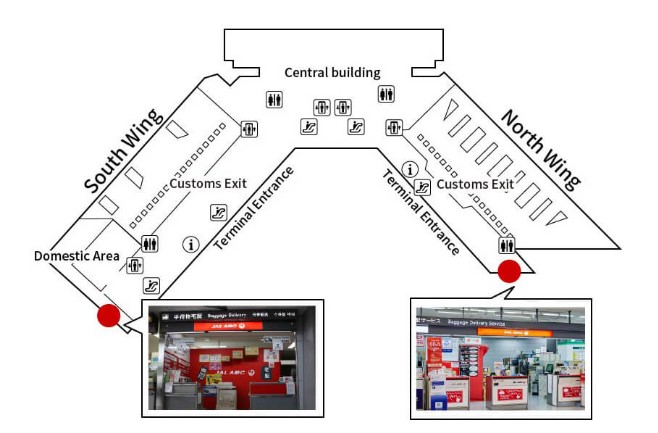
Opening hours: 06:30 until one hour after the last arriving flight.
JALABC Arrival Counter Terminal 2

Opening hours: 06:30 until one hour after the last arriving flight.
BIC Camera shops
BIC Camera is a large Japanese electronics chain. The Narita store stocks a range of visitor SIMs from multiple carriers alongside electronics and travel kit. Useful if you want to look at a few options side by side.
Location: Terminal 2 Main Building, 4th floor, before security check.
Opening hours: 08:00 to 20:00


Conclusion
For me, this is a simple call. If your phone supports eSIM, get Airalo or another reputable provider, install it before you fly, and you’ll be online the moment you land. I’ve used Google Maps on every train, walk and detour across Japan, and even somewhere as huge as Shinjuku station was easy because the directions were always there in my pocket. Coming from London I’m used to complicated transport, so the combination of Tokyo’s signage and Google Maps was perfectly manageable.
If your phone doesn’t support eSIM, head for one of the counters above. If you’re three or more people sharing, look at pocket WiFi.
Travelling further than Tokyo? Here’s your guide to the Hakone Loop, a perfect ryokan stay, and the best things to do in Osaka, Japan’s kitchen.


13 Comments
Comments are closed.